Combining the two best CI/CD pipelines for embedded and IoT
Pairing together Platformio CI, Wokwi and GitHub Actions


I'm a big fan of automating things. Sometimes, I find myself spending more time configuring and managing these automations than I would ever spend time manually handling these tasks. This is especially true when it comes to software development, where I firmly believe that using the right tools can save you a lot of time and hassle.
Continuous Integration (CI) is one of these automations, which is widely adopted in the world of Software development, and up until this point it wasn't adopted that widely in the world of embedded development. But luckily, that is changing now in 2023.
In my previous article, I already covered automated unit testing and coverage analysis, and now it is time to discuss the next step in the testing pyramid - integration testing, with the help of the amazing Wokwi project!
Shameless plug
This article is written as a result of the development of the SenseShift project. If you are a fan of Virtual Reality and Open Source, consider checking it out: SenseShift is an open-source firmware for the VR Accessories ecosystem. With SenseShift, you can build your own VR Haptic Vests, Haptic Gloves, and much more!
Prerequisites
Everything covered in this article is built on top of my previous GitHub actions configuration, covered in this article:
I highly encourage you to read the previous article first for better understanding.
What is Wokwi?
Wowki positions itself as an IoT Projects Simulator in Your Browser, and sure it does! It supports a number of different platforms, such as Arduino AVR, ESP32, Raspberry Pi, and STM32, and many different languages and frameworks, such as Arduino, MicroPython, CircuitPython, and Rust.
But it does not stop there! Apart from working in your browser, Wokwi also offers two great features: Wokwi for VSCode and Wokwi CI, and these are the features we will use today the most!
Designing your hardware diagram
What am I building?
In the heart of every IoT or Embedded project, the MCU is placed. As I mentioned before, Wokwi supports a lot of different architectures, but I will use ESP32 since currently my project is based on this hardware. You can select from a number of different ESP32 boards, but I will stick to a normal ESP32, which is commonly referred to as ESP32-DevKitC V4.
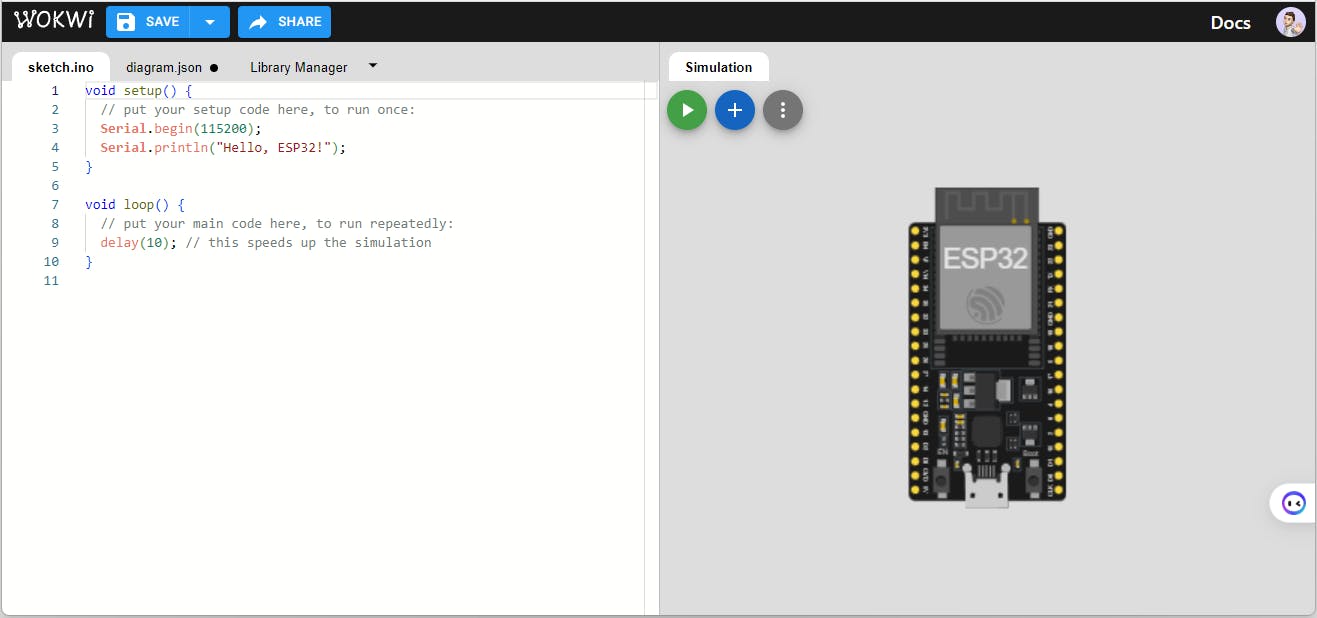
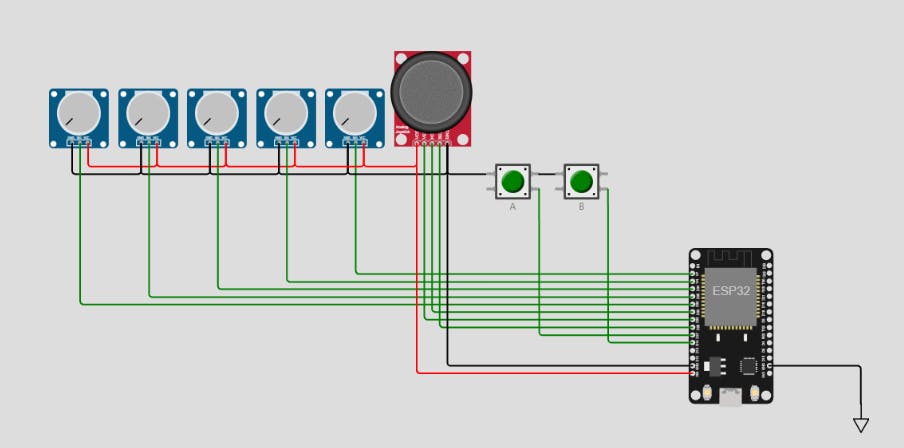
After you've created your Wokwi Project, you will need to add all your hardware components, such as buttons, LEDs, encoders, and so on. Wokwi features dozens of different parts and even allows you to design your own. But in my case, I will add 5 potentiometers, 2 buttons, and an analog joystick.
Verifying schematic with Wokwi for VSCode and PlatformIO
I use PlatformIO to develop my SenseShift project, and, unfortunately, Wokwi's own Code Editor is no use for me. But even in this case, Wokwi gets us covered with Wokwi for VSCode. This plugin pairs insanely well with PlatformIO, which is also designed around Visual Studio Code.
Installing the Wokwi plugin.
To install Wokwi for VSCode you can follow Wokwi's own installation guide, which you can find below:
At the moment of writing, Wokwi for VS Code is in public beta and is completely free. However, after the beta, some features will be available only to paid users.
Setting up multiple schematic variants in Wokwi VSCode.
Wokwi's own documentation features a lot of different examples for PlatformIO + Wokwi configuration, but unfortunately, none of which was useful for me: I have different hardware options. Thankfully, Wokwi VSCode already has a feature to select a single configuration from multiple present in the project.
In all available examples, all the Wokwi configuration files were stored in the root folder, but I ended up with the following structure for all my configs: .wokwi/<name>, in my case it was .wokwi/lucidgloves-prototype3and .wokwi/lucidgloves-prototype4
For Wokwi VSCode to function, you will need two files: wokwi.toml and diagram.json. The diagram.json file stores your hardware schematic and you must copy it from our previous step.
The wokwi.toml file we will need to configure manually. Since our project is built on ESP32, we will need bin and elf files and my config ended up looking like this:
[wokwi]
version = 1
firmware = "../../.pio/build/lucidgloves-prototype3/firmware.bin"
elf = "../../.pio/build/lucidgloves-prototype3/firmware.elf"
gdbServerPort=3333
Let's break this down! Here, we can see some very weird relative paths, but, actually, it is quite simple: the ../../ part means that we go to the repository root (./.wokwi/lucidgloves-prototype3/../../ translates into just ./), the .pio/build is the standard PlatfomIO target binary directory, and lucidgloves-prototype3 is just a PlatformIO Environment. In general, if you are using the PlatformIO with Wokwi, your paths will follow this structure: <platformio build dir>/<environment>/firmware[.bin|.elf]
Starting the simulation
To start the simulation, you must first build your target firmware. With PlatformIO it is done with the PlatformIO Build command (or Ctrl + Shift + B keyboard shortcut). In case you're using multiple environments, you also must first select the same environment you specified in the Wokwi config file. After building the firmware, run the Wokwi: Select Config File command and the last step, Wokwi: Start Simulator! Voila, you're now running a simulation in VSCode with your own PlatformIO firmware!
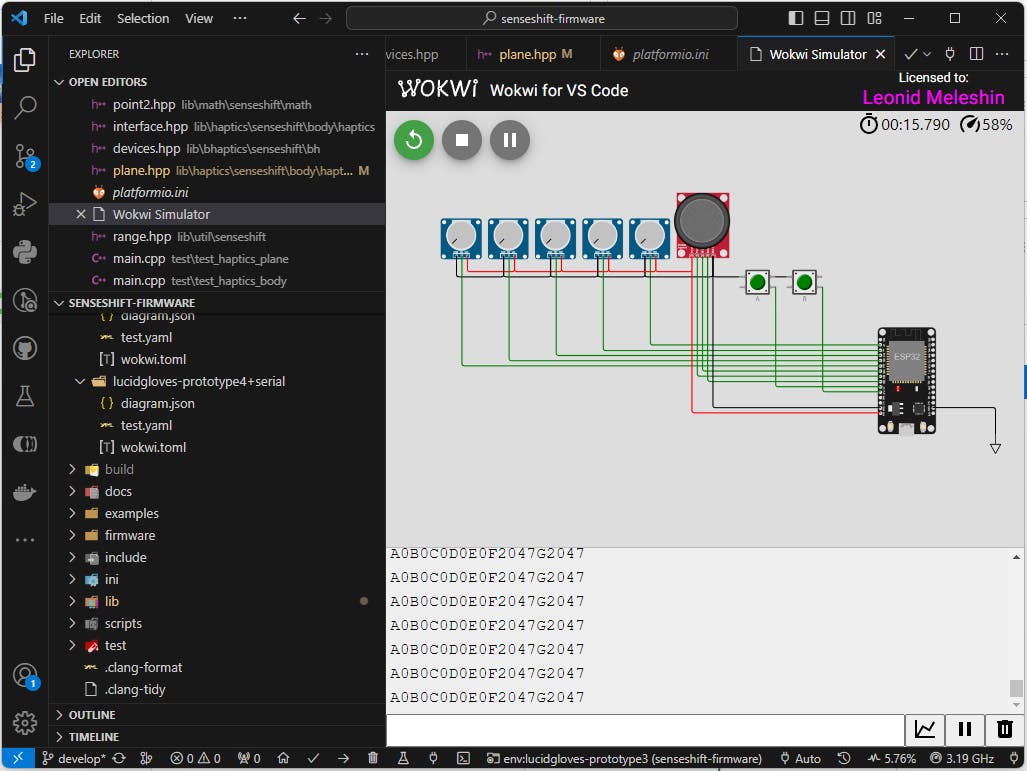
Wokwi: Start Simulator and Wait for Debugger to debug your code! Breakpoints, watchers: full GDB support! However due to the bug in the PlatformIO, it must be manually re-configured every time. You can read more about Debugging with Wokwi in the Documentation.Now you can manipulate your schematic right in the VSCode: push buttons, move joysticks, and see the Serial output.
A general sequence to run the simulator:
Select the PlatformIO environment in the bottom-left corner of VSCode
Build the firmware with
Ctrl+Shift+P->PlatformIO: BuildcommandSelect the configuration:
Ctrl+Shift+P->Wokwi: Select Config FileStart the simulation:
Ctrl+Shift+P->Wokwi: Start SimulatorEnjoy!
Automated testing in GitHub Actions with Wokwi CI
Now that we've verified that our setup works correctly with Wokwi, it's time to finally implement what we're here for: Wokwi for CI!
Wokwi Documentation also has great setup documentation. But generally speaking, you need to create a Wokwi CI token and store it as WOKWI_CLI_TOKEN in your GitHub Actions Secrets.
Writing a test scenario
Wokwi CI features advanced testing scenarios, that allow you to assert multiple stages step-by-step. Currently, Wokwi CI allows to assert expected behavior based on the pin state with expect-pin step and serial output with wait-serial step. Below, you can find a simplified example of my configuration:
name: Test LucidGloves Prototype 4
version: 1
author: Leonid Meleshin

steps:
    - wait-serial: "A0B0C0D0E0F2047G2047"

    # Press the 'A' button
    - set-control:
          part-id: btn1
          control: pressed
          value: 1
    - wait-serial: "A0B0C0D0E0F2047G2047J"

    # Press the 'B' button
    - set-control:
          part-id: btn2
          control: pressed
          value: 1
    - wait-serial: "A0B0C0D0E0F2047G2047JK"
Let's break it down! In this configuration, we have 5 steps. Each step will be executed after the previous succeeded. My first step waits for the serial output, which in my firmware means successfully booting. In the 2nd and 3rd steps, we are pressing the A button and waiting for updated Serial output, and in the 4th and 5th steps we are doing the same, but for the B button.
Verifying test scenario in CLI
Before putting the test scenario in GitHub CLI, you may want to test if you've correctly configured it. You can do it by installing a Wokwi CI executed locally with the following command: curl -L https://wokwi.com/ci/install.sh | sh on Linux and iwr https://wokwi.com/ci/install.ps1 -useb | iex on Windows. Alternatively, you can follow the official guide for more custom setup.
Now, you can run your automated testing scenario on your local machine in a terminal. My command ended up looking like this:
export WOKWI_CLI_TOKEN=<token>
wokwi-cli ./.wokwi/lucidgloves-prototype4--scenario ./.wokwi/lucidgloves-prototype4/test.yaml
If everything went correctly, you should see Scenario completed successfully message in your terminal.
Configuring Wokwi CI in GitHub Actions
Wokwi's great team already provided an official wokwi/wokwi-ci-action@v1 GitHub Action, available on the marketplace. For my configuration, to easily test multiple different targets, I use Matrix builds:
name: PlatformIO CI

on:
  workflow_dispatch:
  pull_request:
  push:

jobs:
  build-and-test:
    runs-on: ubuntu-latest
    strategy:
      matrix:
        target:
          - lucidgloves-prototype3
          - lucidgloves-prototype4
    steps:
      - uses: actions/checkout@v3

      - uses: actions/cache@v3
        with:
          path: |
            ~/.cache/pip
            ~/.platformio/.cache
          key: ${{ runner.os }}-pio-${{ matrix.target }}

      - uses: actions/setup-python@v4
        with:
          python-version: '3.9'

      - name: Install PlatformIO
        run: |
          python -m pip install --upgrade pip
          pip install --upgrade platformio
          pio upgrade --dev
          pio pkg update --global

      - name: Install libs
        run: pio pkg install -e ${{matrix.target}}

      - name: Run PlatoformIO Unit Test
        run: pio run --environment native

      - name: Build PlatformIO Project
        run: pio test -e ${{matrix.target}}

      - name: Run Wokwi scenario
        uses: wokwi/wokwi-ci-action@v1
        with:
          token: ${{ secrets.WOKWI_CLI_TOKEN }}
          path: ./.wokwi/${{ matrix.target}}
          scenario: "test.yaml"
Notice, that I'm using the same variable ${{ matrix.target}}, since my PlatformIO environment and Wokwi config path are matching!
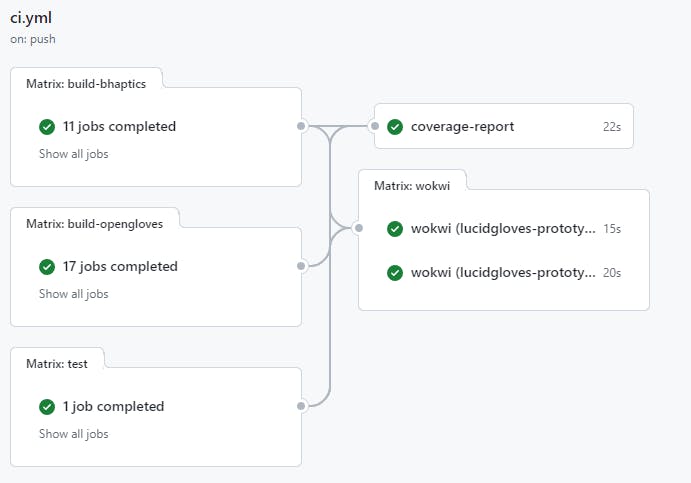
Putting all together
My final pipeline ended up looking substantially more complex:
I build all PlatfomIO firmware environments with different build flags and collect initial coverage;
I run the Unit Tests with coverage;
I combine all coverage reports and upload them to Codecov
At last, I run Integration Tests with Wokwi
You can find my production pipeline on my GitHub: